what bios option allows a technician to enable an integrated port and set a bios password?
In this sample affiliate from CompTIA A+ 220-901 and 220-902 Cert Guide, fourth Edition, writer Marker Edward Soper covers; Introduction to BIOS/UEFI, explaining the motherboard'south firmware, known equally the BIOS or UEFI. BIOS/UEFI Configuration which demonstrates how to access the BIOS and modify settings; for example, RAM, processor, and video settings. Flash Upgrade BIOS/UEFI where you'll learn how to upgrade the BIOS through a process known as flashing and Using BIOS/UEFI Diagnostics where you'll learn most diagnostic features built into many BIOS/UEFI chips.
This chapter is from the volume
This chapter covers the following subjects:
-
Introduction to BIOS/UEFI—This department explains the motherboard's firmware, known as the BIOS or UEFI.
-
BIOS/UEFI Configuration—This section demonstrates how to access the BIOS and modify settings; for example, RAM, processor, and video settings.
-
Flash Upgrade BIOS/UEFI—In this department, you acquire how to upgrade the BIOS through a procedure known equally flashing.
-
Using BIOS/UEFI Diagnostics—In this department, you learn nigh diagnostic features congenital into many BIOS/UEFI chips.
The Basic Input/Output System (BIOS) is an essential component of the motherboard. This boot firmware, also known as System BIOS or, on most recent systems, unified extensible firmware interface (UEFI), is the first code run by a computer when information technology is booted. It prepares the machine by testing it during bootup and paves the style for the operating system to starting time. It tests and initializes components such every bit the processor, RAM, video card, hard drives, optical, and USB drives. If any errors occur, the BIOS/UEFI reports them as office of the testing stage, known every bit the power-on cocky-test (POST). The BIOS/UEFI resides on a ROM chip and stores a setup programme that you can admission when the computer first boots upwardly. From this program, a user tin can change settings in the BIOS and upgrade the BIOS as well. In this chapter, you detect out about how the BIOS/UEFI, CMOS, and batteries on the motherboard collaborate and learn how to configure and upgrade the BIOS.
From this point on, the term BIOS refers to both traditional BIOS and UEFI firmware except when they differ in part.
220-901: Objective i.1 Given a scenario, configure settings and use BIOS/UEFI tools on a PC.
Foundation Topics
BIOS/UEFI Configuration
The system BIOS has default settings provided by the system or motherboard maker, but as a system is built up with storage devices, retentivity modules, adapter cards, and other components, it is usually necessary to modify the standard settings.
To perform this task, the organisation assembler must use the BIOS setup program to make changes and save them to the CMOS (complementary metal oxide semiconductor) chip. Originally, the BIOS setup program was run from a bootable floppy disk, but for many years virtually all system BIOS chips have included the setup programme.
Accessing the BIOS Setup Program
The BIOS configuration program is stored in the BIOS chip itself. Just printing the key or key combination displayed onscreen (or described in the manual) to get started.

Although these keystrokes vary from organisation to system, the near popular keys on current systems include the escape (Esc) fundamental, the Delete (Del) primal, the F1 cardinal, the F2 fundamental, or the F10 key.
Most recent systems display the cardinal(s) necessary to start the BIOS setup programme at startup, as shown in Effigy two-1. However, if you don't know which cardinal to press to start your computer's BIOS setup plan, check the arrangement or motherboard manual for the correct cardinal(southward).
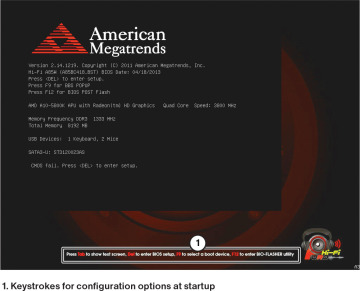
Effigy two-i A typical splash screen displays the keystrokes needed to get-go the BIOS setup program.
Be sure to consult the transmission that came with your computer or motherboard earlier toying with the settings you detect hither. Fiddling with the settings tin improve performance, only information technology tin can also wreak havoc on an otherwise healthy device if yous don't know what you're doing. Be warned!
UEFI and Traditional BIOS
Most recent desktop and laptop computers (and all desktop and laptop computers from 2014 on) now use a new type of firmware called the Unified Extensible Firmware Initiative (UEFI) to display a mouse-driven GUI or text-based menu for BIOS setup. OS X computers all use UEFI firmware. Compared to a traditional Flash ROM BIOS, UEFI has the following advantages:
-
Support for hard drives of two.2TB and higher capacity. These drives require the use of the GUID Partition Table (GPT) to access full capacity.
-
Faster system startup (booting) and other optimizations.
-
Larger-size ROM fries used by UEFI make room for additional features, better diagnostics, the power to open a shell environment for like shooting fish in a barrel flash updates, and the power to save multiple BIOS configurations for reuse.
UEFI firmware offers like settings to those used past a traditional BIOS (see Figure 2-2) along with additional options (refer to Figures 2-three and across). Most desktop systems with UEFI firmware use a mouse-driven graphical interface. However, many laptops with UEFI firmware use a text-based interface similar to BIOS.
To learn more about UEFI, visit http://world wide web.uefi.org/.
BIOS Settings Overview
The following sections review the typical setup process using various UEFI firmware versions on systems running Intel Core i3 3227U, Intel Core i5 i6600, AMD FX-8350, and AMD A10-5800K processors.
Table 2-1 provides a detailed discussion of the near important CMOS/BIOS settings. Use this tabular array as a quick reference to the settings you demand to make or verify in any organisation. Examples of these and other settings are provided in the following sections.
Table 2-one Major CMOS/BIOS/UEFI Settings
| Selection | Settings | Notes |
| Kick Sequence | Hard drive, optical (CD/DVD, Blu-ray), USB, network ROM; social club equally wanted | To boot from bootable OS or diagnostic CDs or DVDs, place the CD or DVD (optical) drive before the difficult drive in the boot sequence. To boot from a bootable USB device, place the USB device before the hard drive in the kick sequence. You tin enable or disable boosted boot devices on some systems. |
| Memory Configuration | By SPD or Auto (default); transmission settings (Frequency, CAS Latency [CL], Fast R-2-R turnaround, and and then on) besides available | Provides stable operation using the settings stored in retention by the vendor. Employ manual settings (frequency, CAS latency, and so on) for overclocking (running memory at faster than normal speeds) or to enable memory of different speeds to be used safely by selecting slower settings. |
| CPU Clock and Frequency | Automatically detected on most recent systems | Faster or higher settings overclock the system only could crusade instability (see Chapter 8, "Ports and Interfaces," for details). Some systems default to low values when the organisation doesn't offset properly. |
| Hardware Monitor | Enable display for all fans plugged in to the motherboard | Also known every bit PC Wellness on some systems; can be monitored from within the OS with vendor-supplied or third-party utilities. |
| Onboard Audio, Modem, or Network | Enable or disable | Enable when you don't use add together-on cards for any of these functions; disable each setting before installing a replacement carte du jour. Some systems include two network adapters. |
| USB Legacy | Enable when USB keyboard is used | Enables USB keyboard to piece of work outside the OS. |
| Serial Ports | Disable unused ports; utilize default settings for port you use | As well known every bit COM ports. Most systems no longer have series ports. |
| Parallel Port | Disable unused port; utilise EPP/ECP mode with default IRQ/DMA when parallel port or device is connected | Compatible with well-nigh whatsoever parallel printer or device; be sure to use an IEEE-1284-compatible printer cablevision. Nearly recent systems no longer include parallel (LPT) ports. |
| USB Function | Enable | When motherboard supports USB 2.0 (Hello-Speed USB) ports, be sure to enable USB ii.0 function and load USB two.0 drivers in the OS. |
| USB 3.0 Function | Enable | USB 3.0 ports also support USB 3.1, 2.0, and USB i.1 devices. Disable when USB iii.0 drivers are non available for operating system. |
| Keyboard | NumLock, auto-repeat rate/delay | Get out at defaults (NumLock On) unless keyboard has problems. |
| Plug-and-Play OS | Enable for all except some Linux distributions, Windows NT, MS-DOS | When enabled, Windows configures devices. |
| Primary VGA BIOS | Varies | Select the principal graphics card blazon (PCIe or onboard). |
| Shadowing | Varies | Enable shadowing for video BIOS; get out other shadowing disabled. |
| Quiet Boot | Varies | Disable to brandish system configuration data at startup. |
| Boot-Fourth dimension Diagnostic Screen | Varies | Enable to display system configuration data at startup. |
| Virtualization | Varies | Enable to run hardware-based virtualization programs such as Hyper-V or Parallels so that you can run multiple operating systems, each in its own window. |
| Power Management (Menu) | Enable unless you have problems with devices | Enable CPU fan settings to receive warnings of CPU fan failure. |
| S1 or S3 standby | Enable S3 | Use S1 (which saves minimal power) but when you use devices that do not properly wake upward from S3 standby. |
| AC Pwr Loss Restart | Enable restart or Full on | Prevents the organization from staying down when a power failure takes place. |
| Wake on LAN (WOL) | Enable when you use WOL-compatible network card or modem | WOL-uniform cards apply a small cablevision between the bill of fare and the motherboard. Some integrated network ports as well support WOL. |
| User/Power-On Password | Blocks organisation from starting when password is not known | Enable when physical security settings are needed, but exist certain to tape the password in a secure place. |
| Setup Password | Blocks access to setup when password is not known | Both passwords can exist cleared on both systems when CMOS RAM is cleared. |
| Write-Protect Boot Sector | Varies | Enable for normal use, simply disable when installing drives or using a multiboot system. Helps prevent adventitious formatting but might non cease 3rd-party disk prep software from working. |
| Boot Virus Detection (Antivirus Boot Sector) | Enable | Stops true infections but allows multiboot configuration. |
| SATA Drives | Varies | Auto-detects drive type and settings at startup fourth dimension. Select CD/DVD for CD/DVD/Blu-ray drive; select None when drive is not present or to disable an installed drive. |
| SATA Drive configuration | IDE, AHCI, RAID | IDE setting emulates now-obsolete PATA drives. To accept advantage of hot-swapping and Native Command Queuing (NCQ) to amend functioning, select AHCI. Use RAID when the drive will be used as function of a RAID assortment. |
Automated Configuration of BIOS/CMOS Settings
As yous can see from Table 2-ane, at that place are many options to select when configuring BIOS settings. Many BIOS firmware versions enable y'all to automatically configure your system with a choice of these options from the chief menu:
-
BIOS defaults (too referred to every bit Original/Neglect-Rubber on some systems)
-
Setup defaults (as well referred to equally Optimal on some systems)
These options primarily deal with operation configuration settings in the BIOS firmware, such as retention timings, memory enshroud, and the like. The settings used by each BIOS setup choice are customized by the motherboard or system manufacturer.
Apply BIOS defaults to troubleshoot the system because these settings are conservative in memory timings and other options. Unremarkably, the setup defaults provide amend functioning. As you view the setup screens in this affiliate, yous'll note these options are listed.
With many contempo systems, you can select Optimal or Setup defaults, salvage your changes, and and then exit; the system will then work acceptably. All the same, to configure drive settings, USB settings, or to enable or disable ports, you also demand to work with private BIOS settings, such as the ones shown in the following sections.
Master Menu
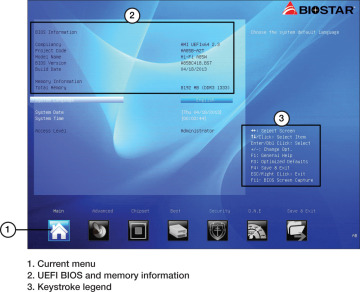
When you beginning the BIOS configuration programme for your system, you might run across a GUI carte du jour similar to the UEFI CMOS Setup Utility menus shown in Figures ii-3 and ii-4. Many laptops and corporate-oriented desktop computers with UEFI BIOS use a text-based carte du jour such as the one shown in Effigy 2-5 (later in this chapter).
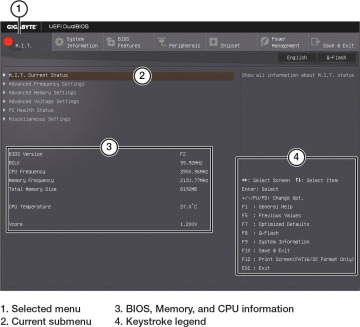
Figure ii-3 A typical UEFI main setup card for a desktop system with an Intel processor (UEFI BIOS for Gigabyte Z170XP-SLI).
Effigy ii-4 A typical UEFI main setup menu for a desktop system with an AMD processor (UEFI BIOS for BIOSTAR Howdy-Fi A85W).
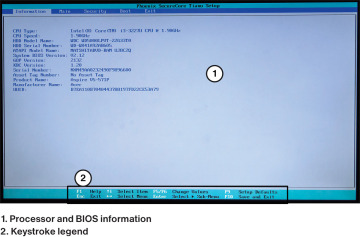
Figure 2-5 Data dialog on a typical laptop with text-based UEFI firmware.
From this menu, you can go to any card, select default settings, save changes, or go out setup without saving any changes.
Main/Standard Features/Settings
The Main/Standard Features/Settings menus (refer to Figures two-3 and ii-iv) frequently written report system features (such equally the motherboard model and onboard RAM) and sometimes besides configure the organization'southward appointment and time. To access other settings, utilize pointer keys or your mouse to highlight the appropriate icon or text carte.
Discovering Organisation Information
Nigh systems display system information such as processor blazon, clock speed, cache memory size, installed memory (RAM), and BIOS information from within the BIOS (see Effigy ii-5). Use this data to help decide whether a system needs a processor, memory, or BIOS update.
Kicking Settings and Boot Sequence
Most computers include settings that control how the system boots and the sequence in which drives are checked for bootable operating arrangement files. Depending on the system, these settings might be function of a larger card, such as an Advanced Settings menu, a BIOS Features carte du jour (meet Effigy two-vi), or a separate Boot menu (run into Effigy two-7).
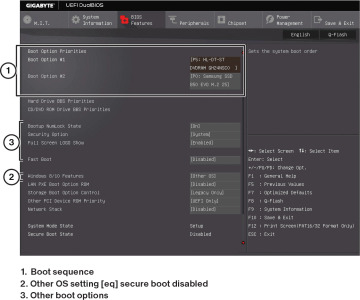
Figure ii-6 Kicking sequence and other boot settings in the BIOS Features menu.
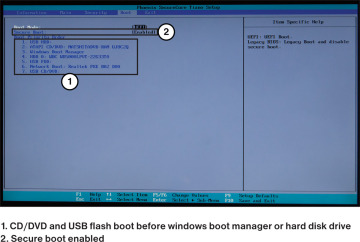
Figure ii-7 A typical Boot carte du jour configured to permit booting from a CD/DVD or USB flash drive before the hard drive.
Enabling Fast Kick skips memory and drive tests to enable faster startup. Enabling Kick Up NumLock turns on the keyboard's NumLock selection.
The menus shown in Figures 2-6 and 2-7 are used to adapt the order in which drives are checked for bootable media. For faster booting, set up the difficult drive with system files as the outset boot device. However, when you want to take the option to boot from an optical (CD/DVD/Blu-ray) disk or from a USB flash or hard bulldoze for diagnostics or operating system installations, put those drives before SATA difficult drives in the boot order.
Integrated Ports and Peripherals
Typical desktop systems are loaded with onboard ports and features, and the menus shown in Figures two-8, 2-9, ii-10, and 2-11 are typical of the BIOS menus used to enable, disable, and configure storage, sound, network, and USB ports.

Effigy ii-8 A UEFI configuration dialog for SATA ports.
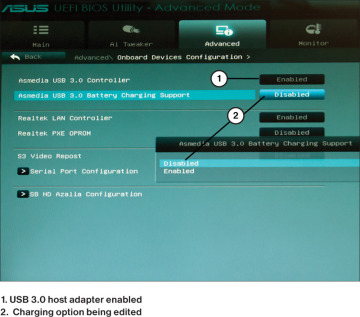
Figure 2-9 Configuring a USB host adapter for battery charging.
SATA Configuration
Utilize the SATA configuration options (such equally those shown in Figure 2-viii) to enable or disable SATA and eSATA ports and to configure SATA host adapters to run in compatible (emulating PATA), native (AHCI), or RAID modes. AHCI supports Native Control Queuing (NCQ) for faster performance and permits hot-swapping of eSATA drives.
To learn more most RAID configuration, see "RAID Types" in Chapter six, "Storage Devices."
USB Host Adapters and Charging Support
Most systems have dissever settings for the USB (ii.0) and USB 3.0 (a.g.a. SuperSpeed) controllers (on systems that have USB three.0 ports). If you don't enable USB 2.0 or USB iii.0 in your organization BIOS, all your organisation's USB ports volition run at the next lower speed.
Some USB configuration utilities can also be used to enable a specified USB port to output at a college amperage than normal to enable faster charging of smartphones. Figure ii-9 illustrates a system with USB iii.0 support enabled and battery charting support existence enabled.
Sound and Ethernet Ports
Depending upon the system, these and other integrated ports might be configured using a common menu or on separate menus. In Figure 2-x, the Hard disk drive "Azalia" onboard sound is enabled; if a dissever audio card was installed, onboard audio should be disabled. SPDIF audio tin be directed through the SPDIF digital sound port (default) or the HDMI AV port (optional) using this bill of fare.
In Figure 2-11, the onboard LAN choice ROM is disabled on this system. Enable it when you desire to boot from an operating arrangement that is stored on a network bulldoze.
Power Direction
Although operating systems include power direction features, the BIOS controls how any given organization responds to standby or power-out conditions. Effigy 2-12 illustrates a typical power management menu.
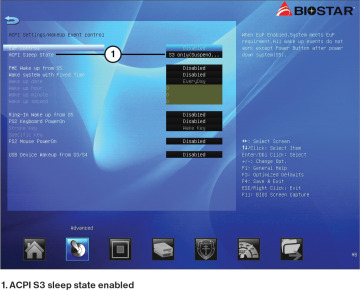
Figure 2-12 Typical power management configuration bill of fare.
ACPI is the power management function used in mod systems, replacing the older APM standard; it should be enabled. Most systems offer ii ACPI standby states: S1/POS (ability on standby) and S3/STR (suspend to RAM). Use S3/STR whenever possible considering it uses much less power when the system is idle.
You can also configure your organization power push button, specify how to restart your organisation when AC ability is lost, and specify how to wake upward a system from standby, sleep, or hibernation modes. Some systems display these settings in the same dialog equally power direction, whereas others utilise a divide dialog or submenu.
Monitoring
Equally hot as a modest room containing a PC tin get, it's a whole lot hotter inside the PC itself. Excessive heat is the enemy of arrangement stability and shortens the life of your hardware. Adding fans can assist, merely when they fail, you have issues. See Chapter vii, "CPUs," for more data.
The Hardware Monitor BIOS dialog (sometimes referred to as PC Health) is a common feature in most recent desktop systems. It is used to brandish the following (refer to Figure 2-13):
-
Temperature monitoring
-
Fan speeds
-
Intrusion detection/notification
-
Voltage

Figure 2-13 Typical PC Wellness hardware monitoring carte du jour.
Many systems can too exist configured to warn when CPU or organisation temperatures reach a dangerously loftier level or when fans finish turning or spin at as well low a speed for proper cooling.
Windows-based hardware monitoring programs can also be used to display this information during normal organization functioning.
Processor and Memory Configuration
To monitor system clock and charabanc speed settings, check the processor and memory configuration dialog typically available on gaming-oriented systems or others designed for overclocking (come across Effigy ii-14). On these systems, you tin can disable the normal Car settings and manually tweak speeds, voltages, and other timing settings.
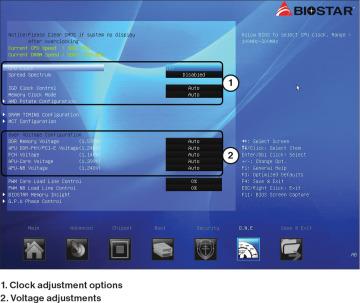
Figure ii-14 CPU configuration dialog used for viewing and changing clock and passenger vehicle speeds for overclocking.
Virtualization Back up
Virtualization is the capability to run multiple operating systems on a single computer at the same time. Although virtualization does not require processor support, virtualization programs such as Windows Virtual PC and Hyper-Five, Oracle VM VirtualBox, and versions of VMware Workstation provide much ameliorate performance on systems that have hardware-assisted virtualization back up enabled.
For a system to support hardware-assisted virtualization, it must include a CPU that supports virtualization and virtualization must exist enabled in the arrangement BIOS.
Intel-based systems with VT support might have two entries for virtualization. Intel Virtualization Technology (also known as VT or VT-x) must exist enabled for hardware-assisted virtualization to be supported. Intel VT with Directed I/O (VT-d Tech) tin can also be enabled to help better I/O performance, although processors that back up VT-ten vary in their levels of VT-d back up. Some systems, such every bit the one shown in Effigy 2-15, have a unmarried entry that enables or disables virtualization. When VT-d is enabled, VT-x is likewise enabled.
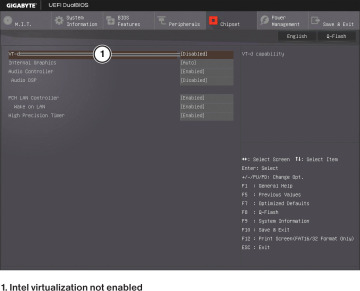
Figure two-fifteen Virtualization is not enabled on this Intel-based organisation.
AMD-based systems that support hardware-assisted virtualization feature a unmarried BIOS setting that might be labeled Virtualization, Secure Virtual Machine Way, or SVM (see Figure 2-xvi).
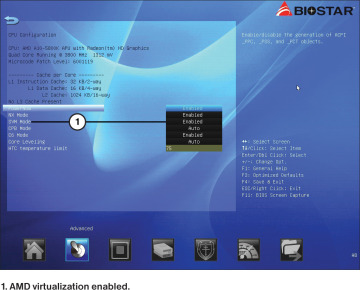
Effigy 2-xvi Virtualization has been enabled on this AMD-based system.
Security Features
Security features of various types are scattered around the typical system BIOS/UEFI dialogs. Features and their locations vary by system and might include:
-
BIOS password—BIOS Settings Password or Security dialogs
-
Ability-on password—Configured through the Security dialog
-
Chassis intrusion—Various locations
-
Boot sector protection—Advanced BIOS Features dialog
-
Secure Kicking—Boot or other dialogs
-
LoJack for Laptops—An afterwards-market product embedded in firmware or installed by the end user; not managed with BIOS dialogs
-
TPM (trusted program module)—Security dialog
Enable the BIOS countersign feature to permit admission to BIOS setup dialogs only for those with the countersign. The power-on password option prevents anyone without the password from starting the arrangement. Note that these options can exist defeated by opening the system and clearing the CMOS retentiveness.
Intrusion detection/notification, likewise known equally Chassis Intrusion, when enabled, displays a alarm on startup that the system has been opened.
Boot sector protection, establish primarily on older systems, protects the default system drive's boot sector from being changed by viruses or other unwanted programs. Depending on the implementation, this option might need to be disabled before an operating system installation or upgrade.
Secure Boot is a characteristic that permits but software trusted by the PC manufacturer to be used to kicking the system. When Secure Boot is enabled, the UEFI firmware checks for signatures on the boot software, option ROMs, and the operating system. Secure Boot back up was showtime introduced in Windows 8, Windows RT, Windows Server 2012, and is also supported in newer versions.
A TPM (trusted programme module) is used past Windows editions that support BitLocker full-disk encryption characteristic to protect the contents of the arrangement hard drive (Vista) or any specified drive (Windows 7/8/8.1/ten). Although many corporate laptops include a congenital-in TPM module, desktop computers and servers might include a connection for an optional TPM. For more data virtually using BitLocker, meet Chapter 21, "Security."
LoJack for Laptops (and other mobile devices) is a popular security feature embedded in the laptop BIOSes of a number of systems and can exist added to other systems. It consists of two components: a BIOS-resident component and the Computrace Agent, which is activated by LoJack when a estimator is reported as stolen. To learn more about LoJack for laptops, tablets, and smartphones meet www.accented.com/en/lojackforlaptops/home.aspx.
Exiting BIOS and Saving/Discarding Changes
When you exit the BIOS setup program, you can elect to save configuration changes or discard them. Many systems with UEFI firmware permit the user to salve multiple BIOS configuration settings (see Effigy ii-17).

Figure two-17 Preparing to save the electric current BIOS configuration to a file.
If you made changes yous desire to keep, choose the option to salvage changes (see Figure 2-xviii). If you were "just looking" and did not intend to make any changes, cull the selection to discard changes (see Effigy two-xix). When you go out the BIOS setup program with either option, the organization restarts.
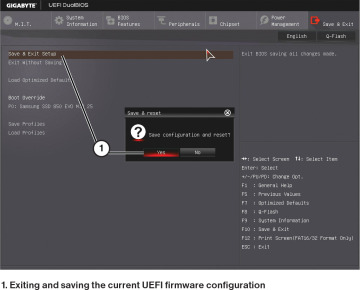
Figure ii-18 Preparing to salve changes and get out the BIOS configuration bill of fare.
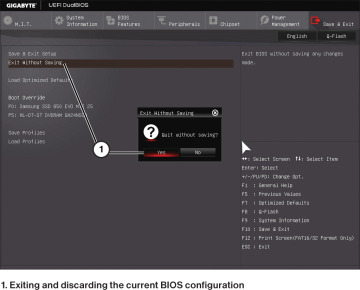
Figure 2-19 Preparing to discard changes and exit the BIOS configuration menu.
Wink Upgrade BIOS
The BIOS scrap tin can exist regarded equally the "glue" that binds the hardware to the operating organization. If the BIOS doesn't recognize the operating organization or the hardware it communicates with, you're certain to accept problems.
Considering the BIOS chip bridges hardware to the operating system, yous need to update the BIOS whenever your electric current BIOS version is unable to properly back up
-
New hardware, such every bit big SATA hard drives and dissimilar types of removable-storage drives
-
New CPU models
-
Retentiveness modules with dissimilar capacities or timings
-
New operating systems and features (such as virtualization or power direction)
-
New BIOS options
BIOS updates can too exist used to solve issues with power direction or other hardware-related issues.
A reckoner that is more 1 year old or that is a candidate for a new processor might need a BIOS update. In the 1980s into the early 1990s, a BIOS update required a physical chip swap and, sometimes, reprogramming the scrap with a device chosen an Electrically Erasable Programmable Read-Only Retention (EEPROM) burner. If the replacement or reprogrammed BIOS fleck was installed incorrectly into the socket, it could be destroyed.
Fortunately, since the mid-1990s, a BIOS update can now be performed with software. The Flash BIOS chips in use on practically every recent system incorporate a special type of memory that tin exist changed through a software download from the system or motherboard maker.
Although Flash BIOS updates are easier to perform than the older, replace-the-scrap style, you still need to be careful. An incomplete or incorrect BIOS update will prevent your system from beingness accessed. No BIOS, no boot! Regardless of the method, for maximum safety, follow these initial steps:
-
Step 1. Dorsum up important data.
-
Step 2. Record the electric current BIOS configuration, peculiarly difficult drive settings as discussed before in this chapter.
Wink BIOS Update
And so you've decided yous need a Flash BIOS update. Where practise you lot get it? Don't inquire the BIOS manufacturers (Phoenix, Insyde, AMI, and Accolade/Phoenix). They don't sell BIOS updates considering their basic products are modified by motherboard and arrangement vendors. Following are the general steps to locate a Wink BIOS update and install information technology:
-
Step 1. For major brands of computers, go to the vendor's website and look for "downloads" or "tech support" links. The BIOS updates are listed by system model and by version; avoid beta (prerelease) versions.
-
Step 2. Locate the right BIOS update for your system or motherboard. For generic motherboards, Wim'southward BIOS page also has links to the motherboard vendors' websites.
-
Step iii. Determine the installation media needed to install the BIOS image. Many recent systems employ a Windows-based installer, but some utilize a bootable CD or USB flash drive.
-
Step iv. Be sure to download all files needed to install the BIOS epitome. In most cases, a download contains the appropriate loader program and the BIOS image, but for some motherboards, you might also demand to download a separate loader program. If the website has instructions posted, impress or salvage them for reference.
For installation from bootable media, encounter Steps five and 6.
-
Step 5. If you demand to create bootable media, follow the vendor'due south instructions to create the media and place the loader and BIOS prototype files on the media.
-
Step 6. To install from bootable media, make sure the drive is the offset item in the BIOS kick sequence. Insert or connect your media and restart the system. If prompted, press a central to start the upgrade process. Some upgrades run automatically, others require you to cull the image from a carte, and still others require the bodily filename of the BIOS. The BIOS update might also prompt you lot to relieve your current BIOS epitome. Cull this option if possible so that you have a copy of your current BIOS in case there's a trouble. After the procedure starts, information technology takes approximately three minutes to rewrite the contents of the BIOS chip with the updated information.
For installation from Windows, see Step 5a and Step 6a.
Stride 5a. Shut all Windows programs before starting the update process.
Step 6a. Navigate to the folder containing the BIOS update and double-click it to first the update process. Follow the prompts onscreen to consummate the process. It takes approximately three minutes to rewrite the contents of the BIOS flake with the updated data.
-
Stride seven. Remove the media and restart the system to employ your new BIOS features. Reconfigure the BIOS settings if necessary.
Using BIOS/UEFI Diagnostics
Some organization vendors provide UEFI diagnostics programs that can be installed on a bootable USB drive or might be available to run at arrangement startup time. These diagnostic programs can be used to test the motherboard, RAM, displays, drives, fans, and other components. Effigy 2-xx illustrates the chief menu of the HP Hardware Diagnostics utility.

Figure 2-20 Preparing to examination a reckoner with HP PC Hardware Diagnostics UEFI.
villarrealtwordor.blogspot.com
Source: https://www.pearsonitcertification.com/articles/article.aspx?p=2730120
0 Response to "what bios option allows a technician to enable an integrated port and set a bios password?"
Post a Comment